Muse Registered a Google Cloud Server for Me: Simple, End-to-End AI Operation
Unlike a traditional step-by-step tutorial, this one has Muse do the Google Cloud sign-up for you, which makes the whole process much simpler.
Contents (10 sections)
First, a heads-up: this is long — about 5 minutes of reading (the core content takes 1 minute).
Unlike a traditional step-by-step tutorial, this one has Muse assist with the Google Cloud sign-up, so the overall flow is much simpler.
Learning AI starts with claiming freebies. Google Cloud Platform (GCP) offers a free server. Compared with Oracle Cloud servers (see the Oracle tutorial here (in Chinese)), it’s the number-two choice — still a very good free server resource. (An Amazon free-server tutorial is coming soon.)
The free Google Cloud server can host a VPN for your own use, so you never need to buy VPN software or subscribe to proxy nodes again❗ Nothing of the kind — and your traffic stays very, very safe.
❗ The Muse skill prompt for installing the HY2 VPN software is pending an update (bookmark and subscribe; it will be updated in a few days)
What to prepare:
-
Any China-issued bank card, debit card, or Visa card works. I recommend the China Merchants Bank Mastercard debit card — for freebie-hunting, a debit card is the safest option, because if there’s no balance in it, nothing can be charged. Case in point: someone on X bought Grok Heavy with a 3-month trial for $30; when it expired, he renewed without reading carefully — it was apparently $3,000 a year. He thought “$3,000 a year” was a bargain, didn’t look closely, and bought it outright. The money still hasn’t been refunded, two-plus months later. (See four foreign-currency debit cards available in China (in Chinese).)
-
A Google account — old or new both work, with a difference: old accounts need a $50 deposit, new accounts $1–10. (With a debit card you need to purchase $50 of foreign currency; with a credit card you don’t. This $50 is the threshold — it works like a deposit: with the deposit in place you can use Google Cloud, and if the deposit is refunded, GCP shuts down automatically.)
-
If you are a Gemini Pro user, you can claim $10 of credit for free every month: visit the Google Developer Program.
The hands-on prompt (copy it into the AI chat box): Based on this file, https://szb123.com/files/gcp-free-vps-skill.md, help me register for Google Cloud Platform. Use the cloud browser, and follow the tutorial to operate the GCP server for me.
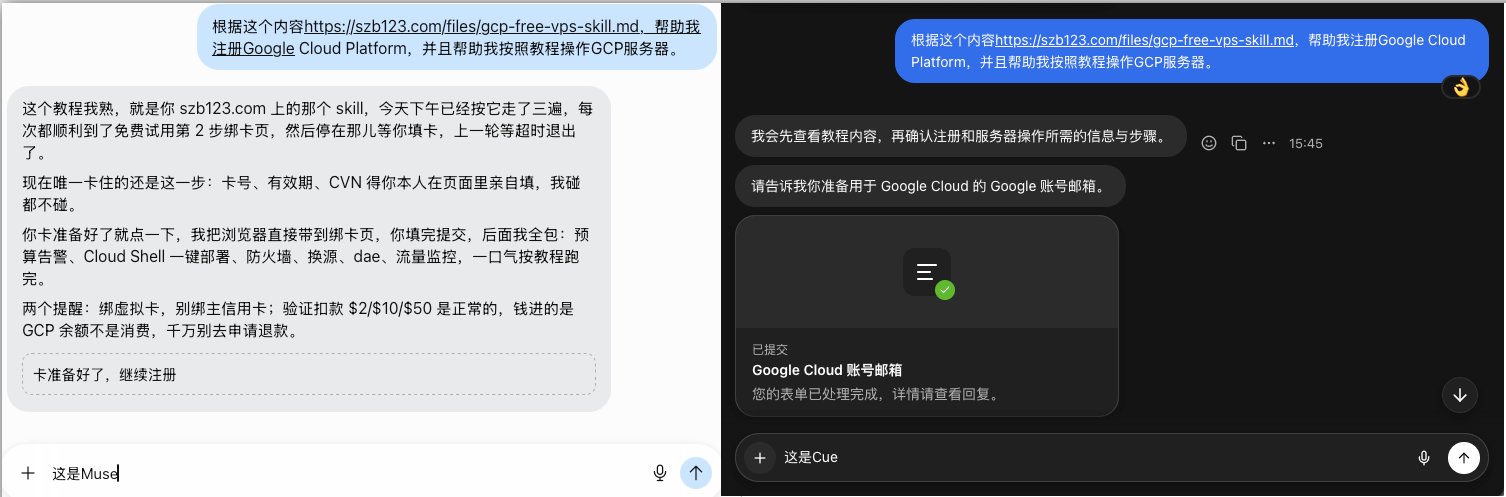
Muse and Cue registering Google GCP — screenshot proof
Supported AIs:
Grok’s Bot
ChatGPT’s Dot
Meta’s Muse
Google’s Spark
All the AIs above support this prompt — copy it and paste it into the AI chat box to run.
❗❗ The detailed walkthrough below is just for reference — it has already been baked into the skill prompt
Google Cloud Platform permanently free VPS setup tutorial (beginner-friendly, with screenshots)
Free allowance at a glance (the free instance created by the script):
| Item | Allowance | Note |
|---|---|---|
| Specs | 1 vCPU / 1 GB RAM / 30 GB disk | Can stay on long-term |
| Inbound traffic | Unlimited | Only egress is counted |
| Outbound traffic | 200 GB/month (standard tier) | Traffic to the Akamai / Cloudflare / Fastly CDNs is not free |
| Public IP | Dynamic IP, free | Changes on every reboot; only static/reserved IPs cost money — don’t upgrade by accident |
1. Preparation before signing up
- What you need
-
✅ A Google account
-
✅ A credit card / virtual card / debit card that passes verification (⚠️ strongly recommend a virtual card or debit card — don’t bind your main credit card)
-
✅ A network environment that can reach Google normally
- Card verification (success rate varies)
GCP sign-up requires a payment method; the verification charge varies by account:
| Account status | Verification | Result |
|---|---|---|
| Trusted old account | Verification only, no charge — bind and go | Least hassle |
| Newer account | Pre-charge of $2 / $10 / $50, varies | Money goes to account balance (not really spent) |
Since 2026, most new accounts are charged for verification after the tightening.
⚠️ Google tightened risk controls because the $300 GCP credit was abused
💡 Field-tested notes: the Fiat24 virtual card works, but in China it currently requires passport registration (the ID-card channel is closed). The CMB Mastercard debit card and CITIC Visa debit card have both passed verification (Japan region, with an 8000 JPY pre-auth). The charged amount goes into your GCP balance rather than being spent; you can request a refund, but after refunding, GCP becomes unusable — treat it as a threshold fee.
- New users: don’t forget the $300 trial credit
First-time GCP users usually get a $300 / 90-day trial credit. During the trial you can spin up premium-network machines in Taiwan or Hong Kong to your heart’s content; once it’s used up or expired, come back and set up the permanently free machine with this tutorial.
- What can you actually do with GCP?
Host a free personal blog, or run VPN software — in my view those are the two most common uses.
2. Understand the core logic of “permanently free”
In one sentence: after opening a paid Google account, you use the free service limits (Free Tier) Google provides to use it for free.
But remember:
⚠️ GCP’s billing system is “price first, discount later” — the system first calculates what you used (hours run, traffic consumed) at list price, then offsets it against the free tier. Once something is misconfigured or you exceed the free allowance, real charges appear. That’s what people call getting “clawed back”.
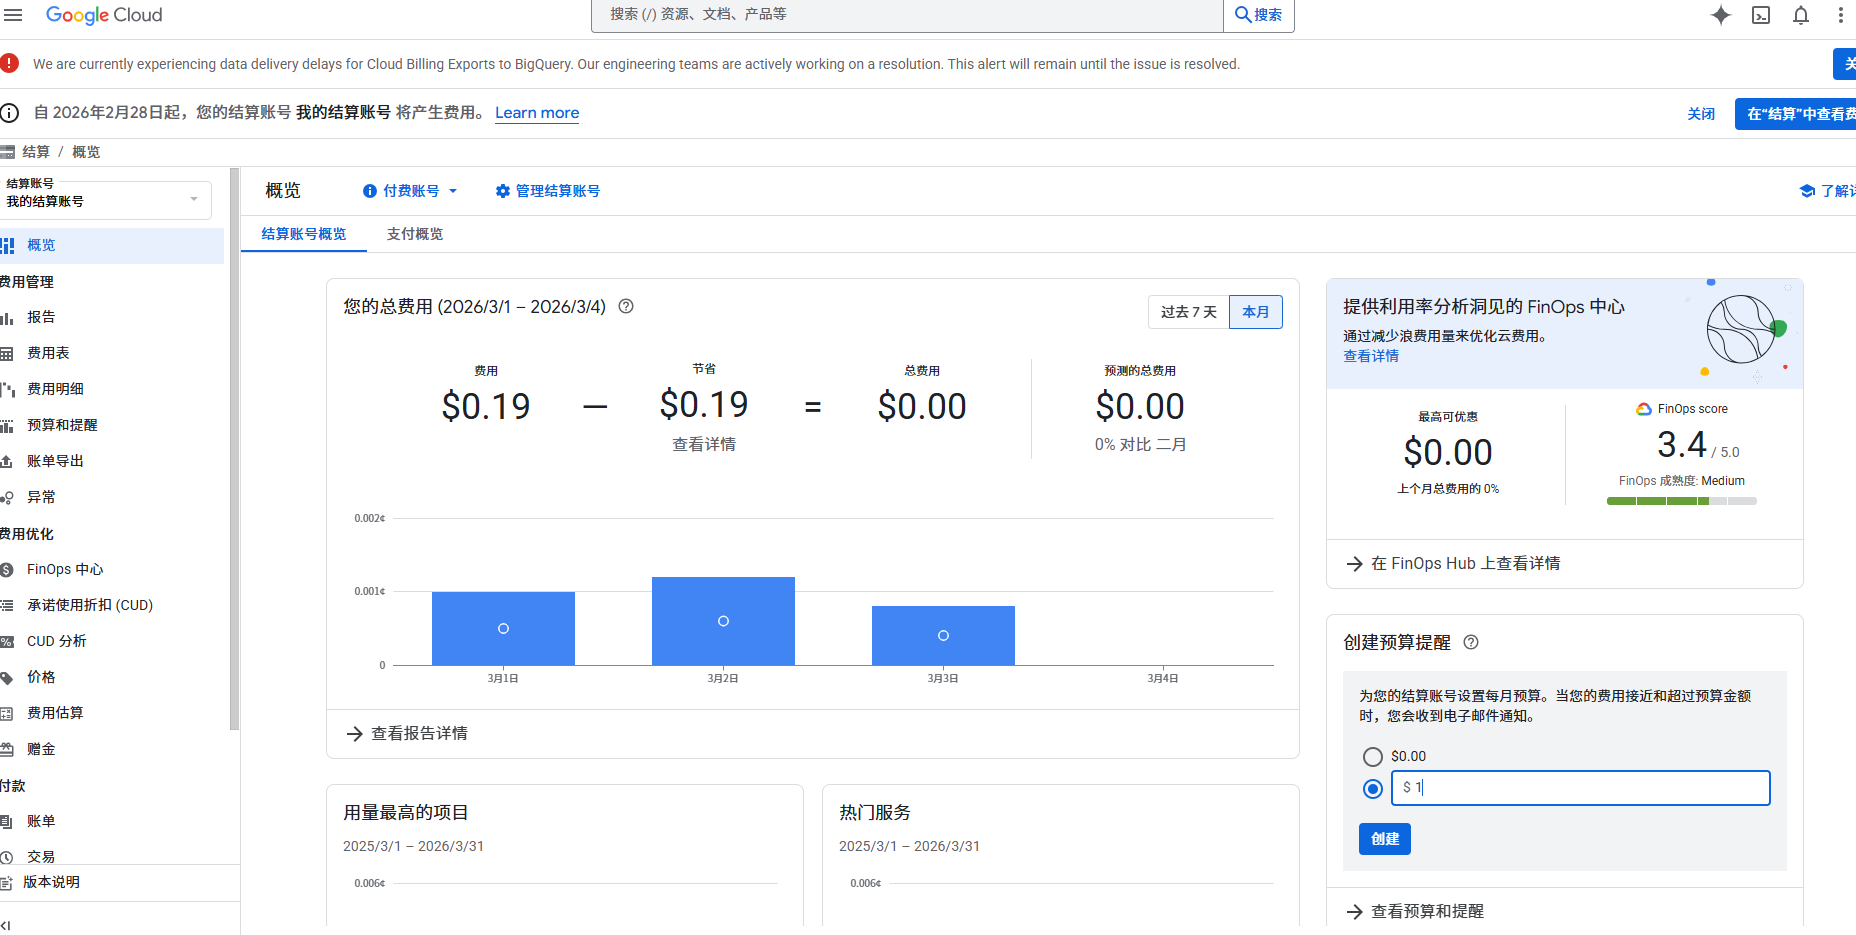
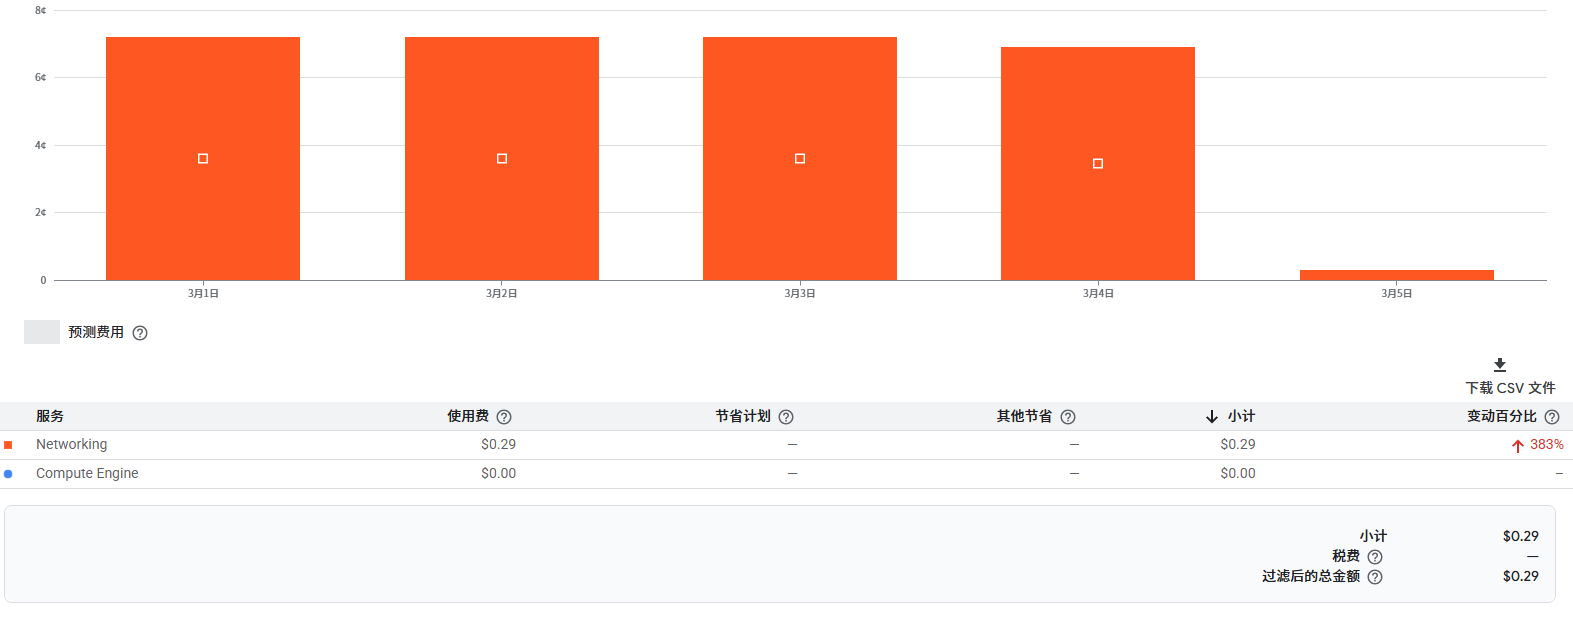
Gemini’s plain-language explanation:
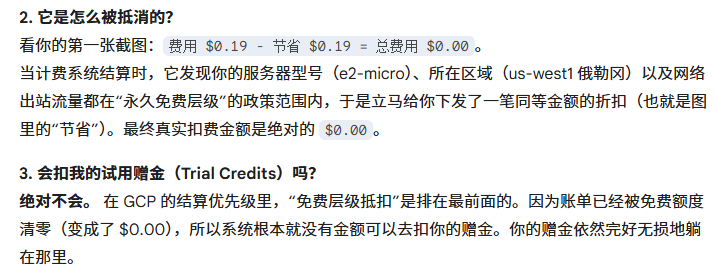
The official Google rule, in short: within the monthly Free Tier usage limits, usage of specific products is free — you only pay for the part that exceeds the limits.
📌 Traffic-tier explainer (a common misconception in the comments): the claim that “free traffic is down to 1 GB” is a rumor. The 1 GB figure refers to the premium network tier; the standard tier is 200 GB/month, and the script in this guide creates a standard-tier instance. Whether something is charged follows the official SKU page.
3. Set up budget alerts (anti-clawback step one)
Before deploying anything, do this first:
-
In the console, go to Billing → Budgets & alerts
-
Create a budget with a monthly amount (say $1)
-
Check email alert at threshold
-
Advanced: enable alerts that include credits — you’ll also be notified when trial credits are nearly exhausted
💡 Set it with confidence: budget alerts don’t count the free allowance as spend. It’s a pure safety fuse and costs nothing. The moment any unexpected billing shows up, you get an email.
Freebie bonus: Google Developer membership gives $10/month
Join the Google Developer Program (requires membership eligibility) to claim $10 of credit per month attached to your billing account:
-
With that $10, even paid-CDN traffic is covered — you may skip the CDN firewall block entirely
-
But keep the 200 GB traffic monitor on anyway — if you really get hit with a traffic spike, $10 won’t cover it
4. One-click deployment via Cloud Shell
- Activate Cloud Shell
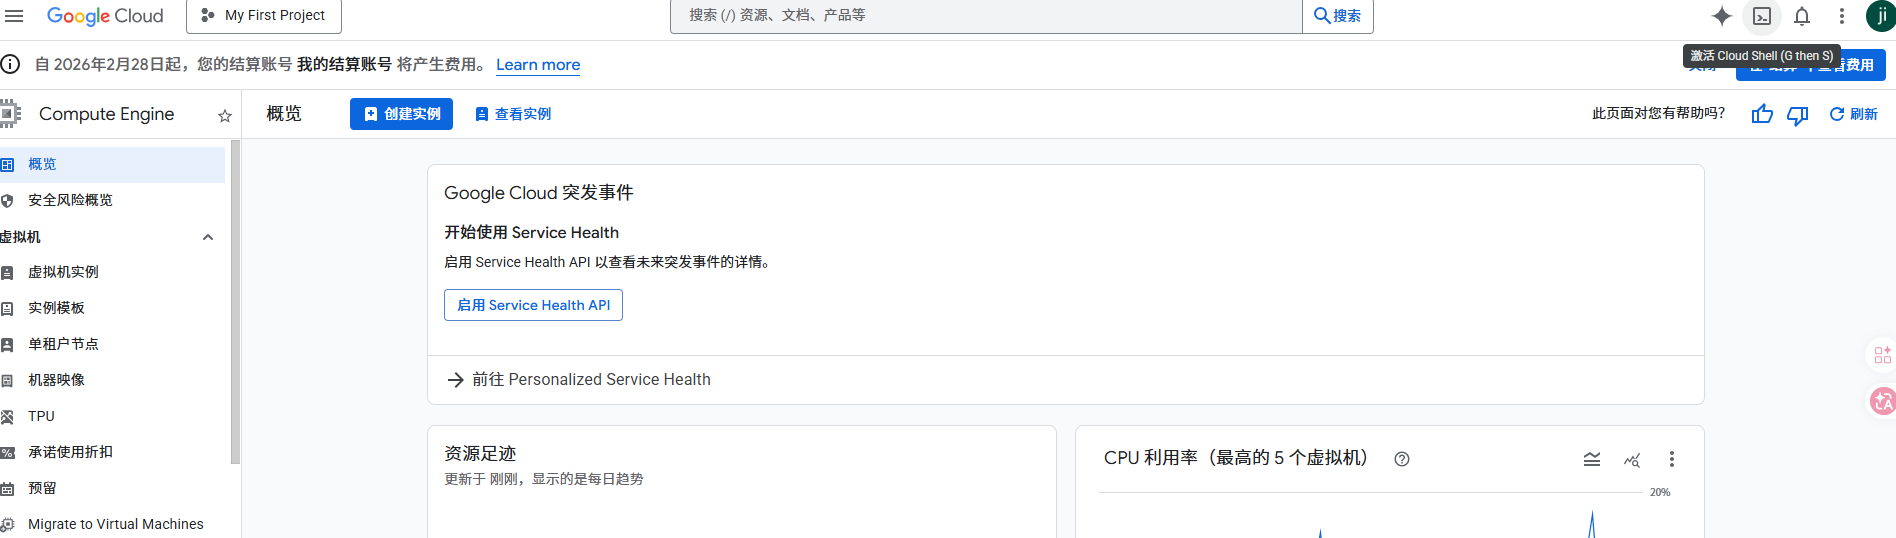
Open the Google Cloud console, click the Activate Cloud Shell icon in the top-right corner, and you’ll get a web-based terminal:
- Run the automation script
This guide deploys with the community open-source script fatekey/gcp_free. In Cloud Shell, enter:
# First run
git clone https://github.com/fatekey/gcp_free && cd gcp_free && bash start.sh

# Subsequent runs
cd ~/gcp_free && bash start.sh
⚠️ The script requires GCP to be in a trial-credit or paid state. If it errors with “no available billing account”, your account is neither in trial nor paid — finish binding a card first.
- Common error: project not set
If you see:
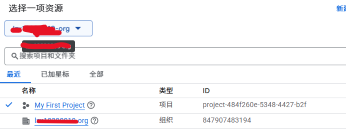
The required property [project] is not currently setit means Cloud Shell isn’t attached to a specific GCP project. Fix:
Open the project selector at the top of the console and find your project ID:
Then run:
gcloud config set project your-Project-ID
cd ~/gcp_free && bash start.sh
5. Walking through the script options (with real pitfalls)
📋 Script main menu: 1 create instance · 3 reroll AMD · 4 firewall rules · 5 Debian mirror swap · 6 install dae · 7 configure dae · 8 traffic monitor · 9 delete resources
Option 1: create the free instance
For the region, Oregon, US West is recommended (low latency):
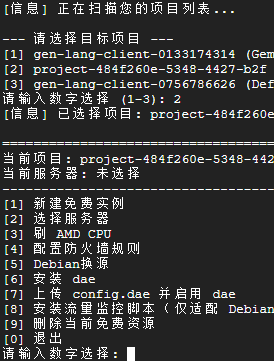
--- Choose a deployment region ---
[1] Oregon [recommended]
[2] Iowa
[3] South Carolina
Enter a number (1-3): 1
Then pick a zone (any of us-west1-a / b / c; the default is usually fine).
💡 OS choice: the script supports Ubuntu and Debian, but the mirror swap (option 5) and traffic monitor (option 8) are only adapted for Debian — just pick Debian without thinking.
Option 3: reroll for an AMD CPU (tested — not recommended)
-
The CPU is randomly assigned Intel or AMD on each boot; AMD is less than 10% faster, and you must power off and reboot to “reroll”
-
Field test: in US West you basically can’t get AMD anymore; the script author’s own words — “rerolling not advised”
-
Play it safe: just use the default Intel machine ✅
Option 4: firewall rules (⚠️ the heart of anti-clawback)
Free egress traffic does not include the three paid CDNs — Akamai, Cloudflare, Fastly. Visiting sites behind those CDNs (ChatGPT, GitHub, DockerHub, etc.) generates a few cents per month in charges.
The script creates two rules:
-
✅ Allow all inbound
-
✅ Block the outbound IP ranges of the three paid CDNs (Akamai / Cloudflare / Fastly) (generated from official geoip data)
💡 If you have credits (like the $10 developer membership), you can skip the block — the few cents are covered directly.
Option 5: Debian mirror swap (twinned with the firewall)
The causal chain: Debian’s default software mirrors sit behind a CDN → once the firewall blocks the CDN, apt can’t connect → every later install (unzip, vnStat, etc.) fails.
So: if you enabled the CDN block in option 4, you must run option 5 to switch to US mirrors that don’t sit behind a CDN. The vnStat install failures in the comments were all traced to a missing mirror swap.
Option 6: install dae (a pitfall minefield in practice)
What dae is and why install it: after the firewall blocks the paid CDNs, sites behind those CDNs (ChatGPT, GitHub, DockerHub) become unreachable. dae is an eBPF proxy client (similar to clash on Linux) — its job is to route that blocked traffic out through a proxy.
⚠️ Common beginner misconception: dae is for giving your little server a proxied connection out — it is not for running the server side. If you want to run a node (as a commercial proxy server), you can do that without dae — but this machine has mediocre routing and limited traffic, so it’s better suited as an exit/backup box, not for serving the public.
Pitfalls I actually hit (from the original post):
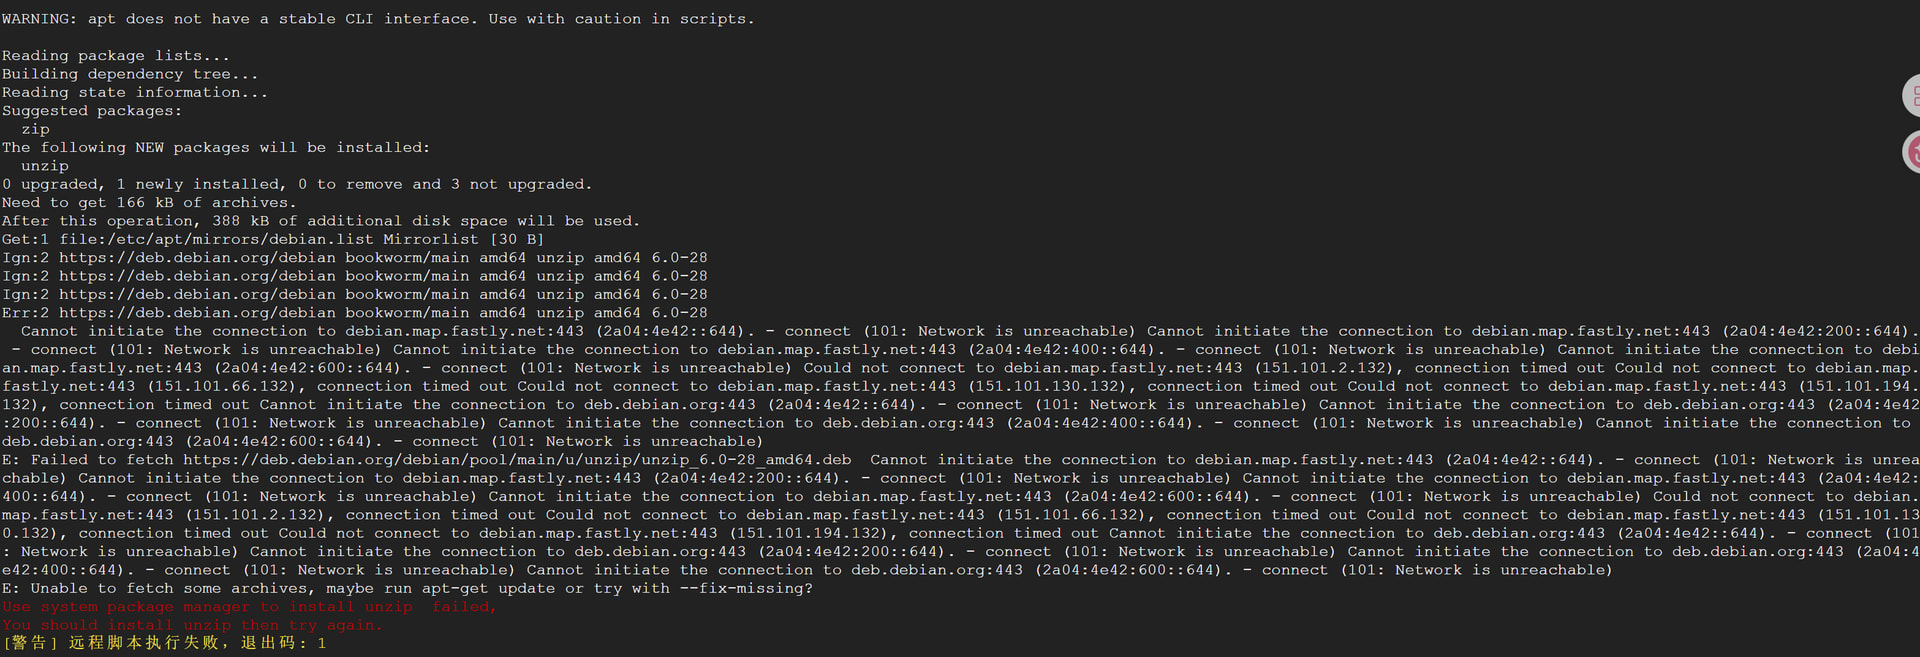
Pitfall 1: apt fails to install unzip — deb.debian.org unreachable: IPv6 first reports “Network is unreachable”, falling back to IPv4 then times out. Cause: no mirror swap (see option 5).
Pitfall 2: the version string comes back empty — the script prints “Installing dae version …” followed by nothing, the download URL gets a double slash …/download//dae-linux-x86_64.zip, and it finally errors “The checksum of the downloaded file does not match!”. Cause: what got downloaded was actually GitHub’s 404 page — checksumming a web page obviously fails.
🔧 Later fixed: the script author confirmed the dae official install script had broken and fixed it in March 2026 — just follow the script now. If it still misbehaves, jump to section 6 and install manually.
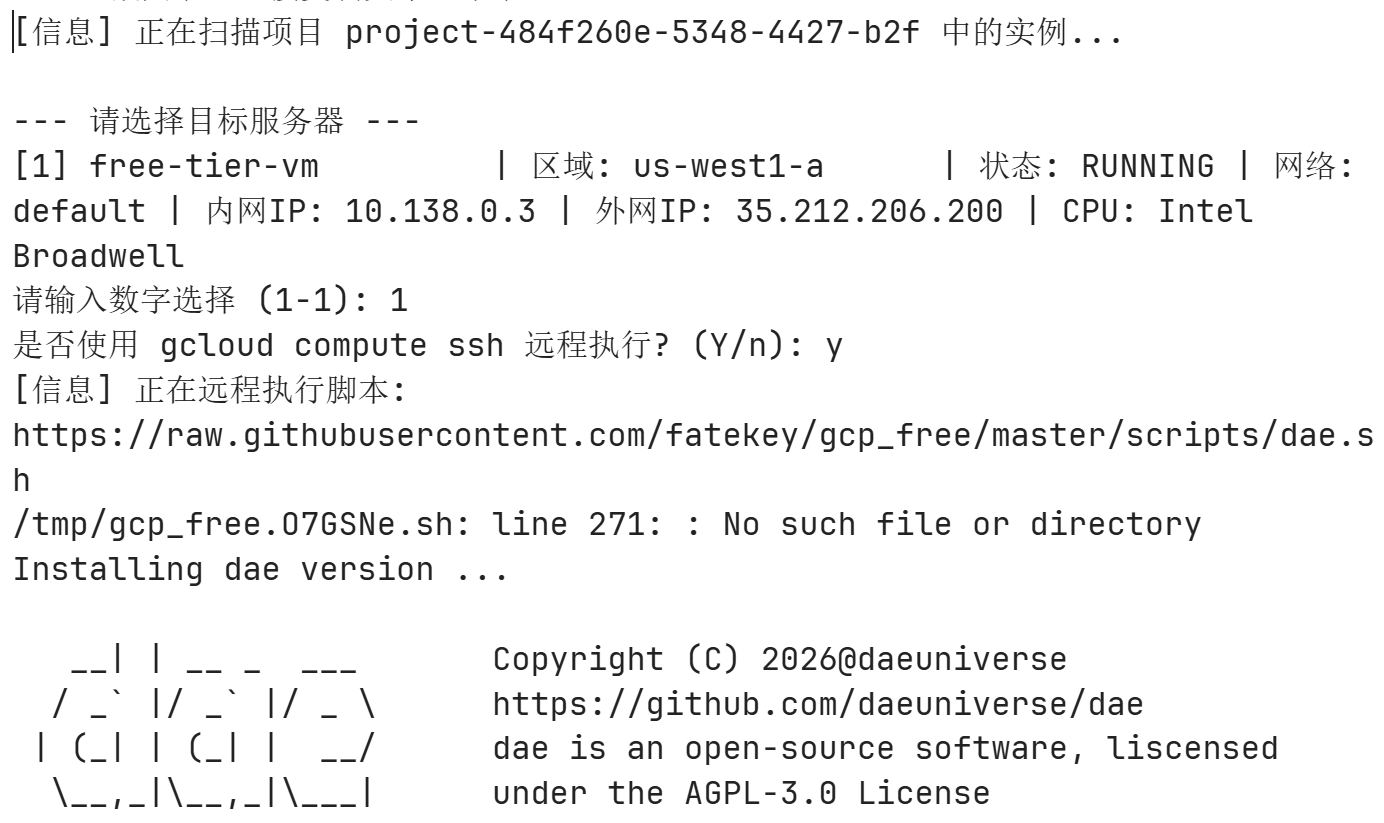
Pitfall 3 (advanced): the newer dae 2.0 occasionally fails to reach the network after starting on GCP’s Debian image kernel (a userspace forwarding compatibility issue); the case in the comments was solved by downgrading to dae 1.1. If you hit it, install a pinned version manually — don’t fight it.
Option 7: configure dae
The script uploads your edited local config.dae (the cloned template) to the server at /usr/local/etc/dae/config.dae and starts dae. All you do beforehand is edit that file locally (in Cloud Shell) and fill in your proxy node (see section 6, step 5).
Option 8: traffic monitor (⚠️ must enable)
Total free traffic is 200 GB/month; the script auto-limits at 180 GB, with two schemes:
-
Scheme 1: auto power off at the cap; manually power back on on the 1st of next month (a reboot resets the traffic counter)
-
Scheme 2: auto block all inbound traffic except SSH at the cap; auto-resets on the 1st of next month
Option 9: delete resources
Not happy with the free machine’s configuration? Delete it in one click and recreate in another region.
6. Manual dae install and configuration (fallback if the script fails)
- SSH into the VM
From Cloud Shell (swap in your own machine name and region; defaults shown for this guide’s flow):
gcloud compute ssh free-tier-vm --zone=us-west1-a💡 On first connect, GCP generates an SSH keypair automatically (private key stored in Cloud Shell at ~/.ssh/google_compute_engine). Just press Enter — no password needed.
- Install dae itself
Following the official dae README, copy-paste:
# Download and install (v1.0.0 shown; switch versions if you hit compatibility issues)
cd /tmp
wget https://github.com/daeuniverse/dae/releases/download/v1.0.0/dae-linux-x86_64.zip
unzip dae-linux-x86_64.zip
sudo mv dae-linux-x86_64 /usr/local/bin/dae
sudo chmod +x /usr/local/bin/dae
sudo ln -sf /usr/local/bin/dae /usr/bin/dae

# Verify the install
dae --version- Download the geodata routing databases
sudo mkdir -p /etc/dae
cd /etc/dae
sudo wget -O geoip.dat https://raw.githubusercontent.com/Loyalsoldier/v2ray-rules-dat/release/geoip.dat
sudo wget -O geosite.dat https://raw.githubusercontent.com/Loyalsoldier/v2ray-rules-dat/release/geosite.dat- Create the systemd service
sudo tee /etc/systemd/system/dae.service > /dev/null <<EOF
[Unit]
Description=dae Service
Documentation=https://github.com/daeuniverse/dae
After=network-online.target docker.service systemd-sysctl.service
Wants=network-online.target

[Service]
Type=notify
User=root
LimitNPROC=512
LimitNOFILE=infinity
ExecStartPre=/usr/bin/dae validate -c /etc/dae/config.dae
ExecStart=/usr/bin/dae run --disable-timestamp -c /etc/dae/config.dae
ExecReload=/usr/bin/dae reload -c /etc/dae/config.dae
Restart=on-abnormal

[Install]
WantedBy=multi-user.target
EOF
sudo systemctl daemon-reload- Write the configuration file
# Copy from the example config (well-commented — recommended)
sudo mkdir -p /etc/dae
sudo cp /tmp/example.dae /etc/dae/config.dae
sudo chmod 0600 /etc/dae/config.dae
sudo nano /etc/dae/config.dae
Single-node users can copy this homework directly (VLESS + TLS shown). Core ideas:
-
node block: keep only your node, delete the rest
-
routing block: domestic traffic direct; common foreign services through the proxy
global {
  tproxy_port: 12345
  tproxy_port_protect: true
  pprof_port: 0
  so_mark_from_dae: 0
  log_level: warn
  disable_waiting_network: false
  enable_local_tcp_fast_redirect: false
  wan_interface: auto
  auto_config_kernel_parameter: true
  tcp_check_url: 'http://cp.cloudflare.com,1.1.1.1,2606:4700:4700::1111'
  tcp_check_http_method: HEAD
  udp_check_dns: 'dns.google:53,8.8.8.8,2001:4860:4860::8888'
  check_interval: 120s
  check_tolerance: 50ms
  dial_mode: domain
  allow_insecure: false
  sniffing_timeout: 100ms
  tls_implementation: utls
  utls_imitate: chrome_auto
  mptcp: false
  bandwidth_max_tx: '500 mbps'
  bandwidth_max_rx: '1 gbps'
}

node {
  my_hub: 'your-vless://subscription-link'
}

dns {
  upstream {
    googledns: 'tcp+udp://dns.google:53'
    cloudflareDns: 'tcp+udp://1.1.1.1:53'
    alidns: 'udp://dns.alidns.com:53'
  }
  routing {
    request {
      qname(geosite:cn) -> alidns
      qname(geosite:google) -> googledns
      fallback: cloudflareDns
    }
  }
}

group {
  proxy {
    filter: name(my_hub)
    policy: fixed(0)
  }
}

routing {
  pname(NetworkManager) -> direct
  dip(224.0.0.0/3, 'ff00::/8') -> direct
  dip(geoip:private) -> direct
  l4proto(udp) && dport(443) -> block
  dip(geoip:cn) -> direct
  domain(geosite:cn) -> direct
  domain(geosite:google) -> proxy
  domain(geosite:github) -> proxy
  domain(geosite:telegram) -> proxy
  dip(geoip:telegram) -> proxy
  domain(geosite:netflix) -> proxy
  domain(geosite:youtube) -> proxy
  domain(geosite:spotify) -> proxy
  domain(geosite:openai) -> proxy
  fallback: proxy
}
💡 For a single-node setup, mind just two things: 1. In the node block add: my_hub: “your-subscription-link” 2. In the group block add: filter: name(my_hub). No proxy of your own? See the FAQ at the end.
- Start and verify
# Validate the config
sudo dae validate -c /etc/dae/config.dae

# Start and enable on boot
sudo systemctl enable --now dae

# Check status
systemctl status dae --no-pager

# Check logs and confirm the node reports ALIVE
sudo journalctl -u dae -n 50 --no-pager | grep -E "ALIVE|node list"
7. Test the node + finish anti-clawback housekeeping
- Connectivity test
# The returned IP should be your proxy node server's IP
curl -L ip.sb

# Check dae logs for anything unusual
sudo journalctl -u dae -n 20 --no-pager- Firewall + traffic monitor (back to script options 4 and 8)
If you skipped them during deployment, come back and finish:
-
Option 4 firewall: allow all inbound + block the three paid CDNs outbound — the core of anti-clawback
-
Option 8 traffic monitor: auto-limit at 180 GB so a traffic flood can’t burn you
- Learn to read the bill (panic relief)
Don’t panic when you see numbers on the bill — gross cost ≠ actual charge:
-
Look at the rightmost column for the amount after adjustments — anything offset by the free allowance shows as 0
-
In the billing report, distinguish two kinds of “savings”: “from credits” (trial credit offsets; gone when used up) and “spend-based discounts” (the permanent free tier; always in effect)
-
What actually deserves vigilance are small charge items that can’t be offset (like a few dozen cents for a static IP or snapshots) — turn them off when spotted
📖 A real case: a reader was scared by “being charged $6–7/month” on the free machine and asked for help. Digging in, almost all of it was gross cost that would be offset. The real problem was a hidden $0.49/month charged item (an unpaid component left on) — turning it off brought it to zero.
- Install a monitoring probe (optional)
Finally, install a komari probe, and watch it light up:
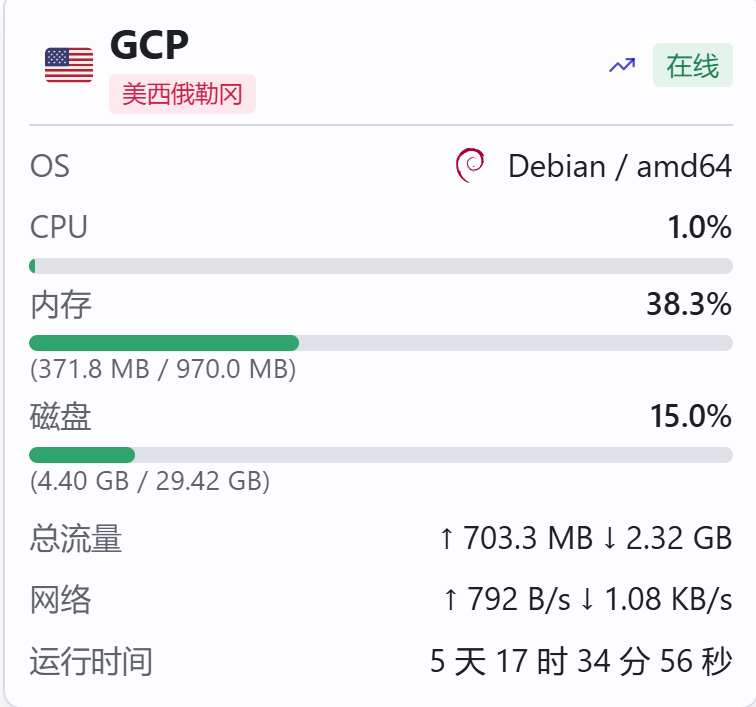
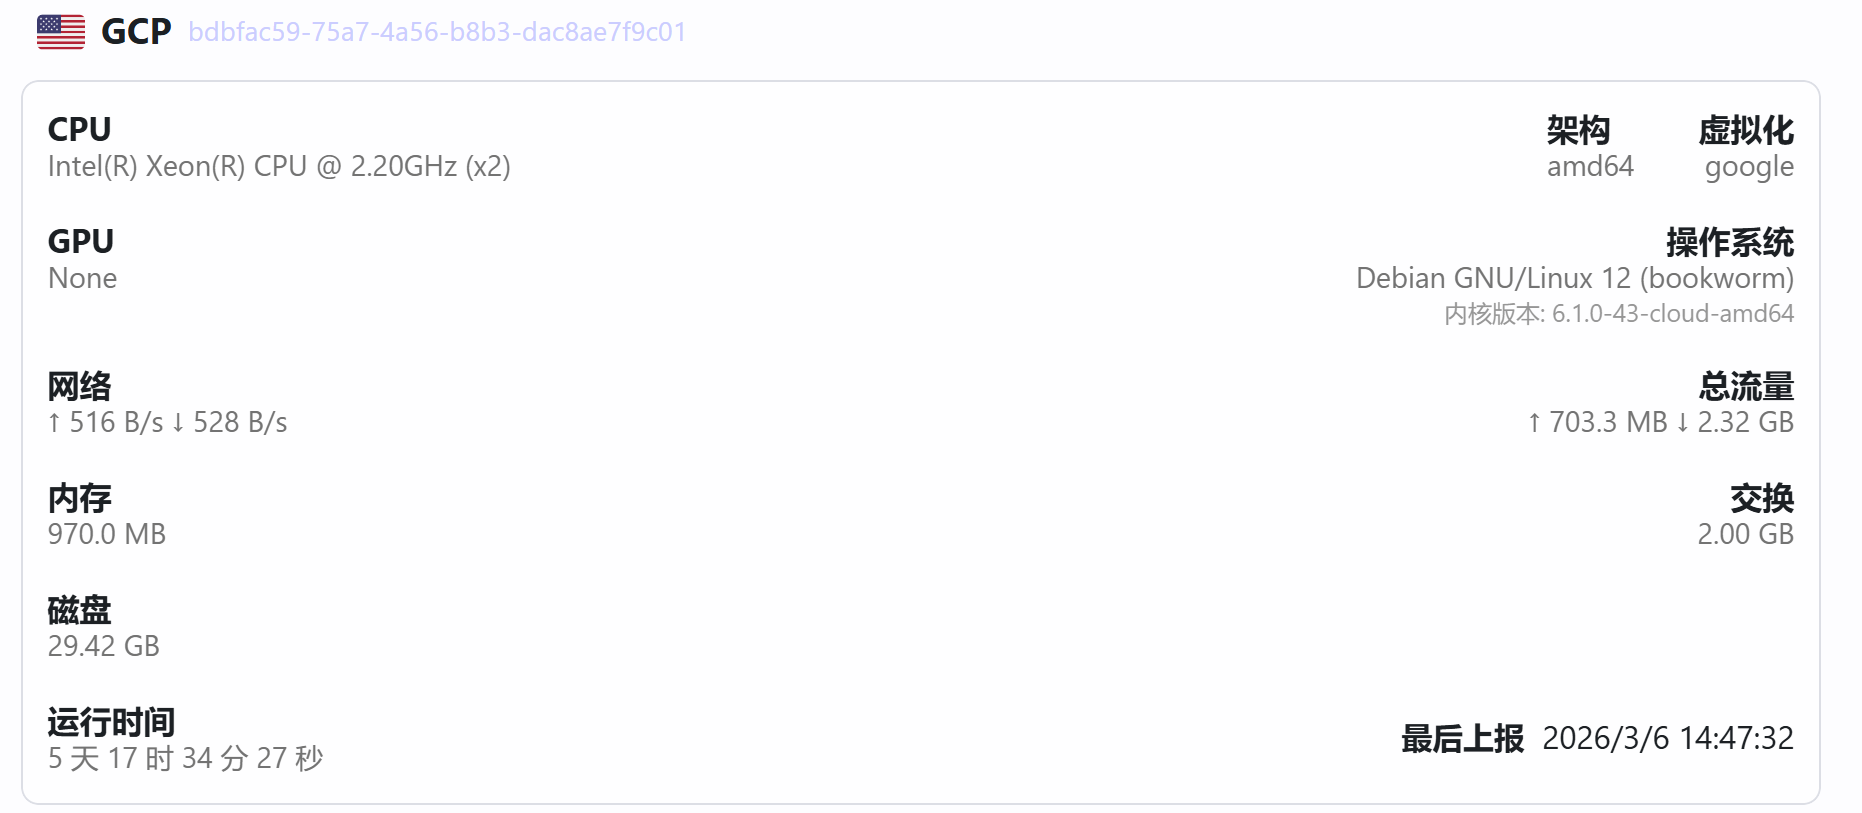
Security reminder: some users had miners planted through probe (e.g. Nezha) vulnerabilities, getting the machine banned by GCP with difficult appeals. Always disable “run command”-style permissions on probes — or don’t install one at all if unsure.
❓ FAQ (high-frequency questions from the comments)
Q1: docker pull fails — what now? DockerHub sits behind Cloudflare and got blocked. Switch the registry mirror to http://mirror.gcr.io, or let dae proxy it through. Bridges created by Compose (br-xxx) must be added to dae’s lan_interface to go through the proxy.
Q2: What is this free machine good for? ✅ Good for: a backup box, exit routing, small self-hosted projects (password managers, memos notes, personal services). GCP’s IPs are cleaner than most cheap VPS providers’, the IP stays stable if you never power off, and risk controls are light. ❌ Not good for: serving proxy nodes or hosting sites for the public — mediocre routing, limited traffic; one DDoS and the 200 GB is gone.
Q3: I want my site faster — how? You can’t sit behind the three blocked CDNs, but you can use the free CDN tiers of Tencent / Alibaba / AWS CloudFront (field reports say EdgeOne also doesn’t get charged).
Q4: Will the IP change? Does it cost anything? The dynamic IP is free and re-randomizes on reboot; it stays the same as long as you don’t power off. Never upgrade the IP to static/reserved in the console — that one is billed hourly.
Q5: Can I run a hysteria2 / hy2 node? ⚠️ Not recommended. Users report hy2’s aggressive packet sending tripped GCP risk controls and got machines banned (appeals work but it’s a hassle); ss/snell have also had bans. Plain VLESS/Trojan runs fine long-term.
8. Timeliness and risk notes (compiled October 2026)
| Risk point | Current state | Advice |
|---|---|---|
| Tightened sign-up charges | Due to $300-credit abuse, Google tightened verification; most new accounts get a pre-charge ($2/$10/$50 — goes to balance, refundable, but refund = unusable) | Set expectations; don’t bind your main credit card |
| Traffic-tier rumor | “Free traffic down to 1 GB” is a rumor: 1 GB = premium tier; the script’s standard tier = 200 GB | Follow the official SKU page |
| IP billing | Dynamic IP free; static/reserved IP charged (about $3–4/month) | Don’t upgrade to a static IP |
| Paid CDNs | Akamai / Cloudflare / Fastly egress isn’t free; other providers fine | Enable the firewall block |
| Protocol risk control | hy2’s aggressive packets can get machines banned | Use conventional protocols like VLESS/Trojan |
| Mining intrusions | Probe vulnerabilities led to miners → bans hard to appeal | Disable command permissions on probes, or skip them |
| Verification charges vary | $2 / $10 / $50 all seen; depends on the account’s “mood” — normal; money goes to balance |
The safest principle: bind a virtual/debit card → set budget alerts → enable firewall + traffic monitor → glance at the “after adjustment” bill once a month.
❗ The Muse skill prompt for installing the HY2 VPN software is pending an update (bookmark and subscribe; it will be updated in a few days)
Changelog
- Oct 9, 2026 First published: the owner's X long-form article, included verbatim with original screenshots.
Sources & data dates
- Owner's original post: X long-form article (in Chinese) — this page's source (in Chinese) · Accessed Oct 9, 2026
- Community open-source script used in this guide: fatekey/gcp_free (GitHub) · Accessed Oct 9, 2026
- Google Cloud official: Free Tier usage limits (Free Tier docs) · Accessed Oct 9, 2026
- Google Cloud official: SKU page (pricing follows the official source) · Accessed Oct 9, 2026
- dae official documentation (GitHub) · Accessed Oct 9, 2026
Translated from the Chinese original; the editorial review applies to the Chinese version.

yedabin Reviewed
A programmer with a science background, former trading-platform engineer, and stand-up comedy fan. Proudest moment: bought 8 BTC for RMB 4,000.
Every factual statement cites sources and access dates. Pages carrying the “Reviewed” badge were checked line by line by a human before publishing.
Reviewed by yedabin (Oct 9, 2026)